Welcome back to Tutorial Thursdays Linky Party.
Today I would like to welcome my wonderful guest blogger Jo over to show you how to create a wonderful Picot edge.
How to Knit a Cuffed Edge Tutorial for Marigold's Loft
by Jo Doran: crookedneedles.net
A knitted cuff has such a finished and professional look to it, and it's not difficult to do. Below are directions for knitting a cuffed edge for a sock, gloves, etc.
Using Two Sizes of Needles
The trick to making a knitted cuff edge is to use two sizes of needles: Use one smaller size to cast on than you would use to knit the sock. So, if I was going to use a size one needle to knit a pair of socks, I would use a size zero needle to begin.
Turning Edge
Cast on as many stitches as required by your pattern. My pattern called for 62 stitches. Knit for as many rows as you want for the size cuff you want. Once you reach the point where you think this is as deep as I want the cuff to be you will need to create a turning edge. This can be done using a picot edge where you knit 2 together, yarn over, and repeat . . .
or where you purl a row. This turning edge will allow the cuff to lay flat. You can see, from the picture just below, that the picot edge creates holes.

How Each Edge Looks


As you knit, keep checking for depth size by folding over at the turning edge. You want to make sure that the edges meet exactly. At this point, you need to combine both the cast-on edge and the current edge.

1. Pick up all the cast-on stitches with the smaller needle. Then fold over so you are knitting with two needles, one on each edge. This is cumbersome to turn, but once turned, it is a very easy way to knit the two edges together. Again, make sure you line up the stitches vertically.


Knit approximately five stitches, and then check to see that you haven't begun a slant on the cuff. If you have, go back and start over catching the back stitch and placing it on the left needle.
Continue Knitting


How to Knit a Cuffed Edge Tutorial for Marigold's Loft
by Jo Doran: crookedneedles.net
A knitted cuff has such a finished and professional look to it, and it's not difficult to do. Below are directions for knitting a cuffed edge for a sock, gloves, etc.
Using Two Sizes of Needles
The trick to making a knitted cuff edge is to use two sizes of needles: Use one smaller size to cast on than you would use to knit the sock. So, if I was going to use a size one needle to knit a pair of socks, I would use a size zero needle to begin.
Turning Edge
Cast on as many stitches as required by your pattern. My pattern called for 62 stitches. Knit for as many rows as you want for the size cuff you want. Once you reach the point where you think this is as deep as I want the cuff to be you will need to create a turning edge. This can be done using a picot edge where you knit 2 together, yarn over, and repeat . . .
or where you purl a row. This turning edge will allow the cuff to lay flat. You can see, from the picture just below, that the picot edge creates holes.

How Each Edge Looks


Making Edges Meet
Once you have knitted a turning edge, begin knitting with the larger size needles, if you have not done so already.As you knit, keep checking for depth size by folding over at the turning edge. You want to make sure that the edges meet exactly. At this point, you need to combine both the cast-on edge and the current edge.
There is a trick to this: as you want to make sure you do not offset the stitches and end up with a slanted cuff. This is exactly what I did the first time I created a knitted cuff edge (see photo just below):

There are three ways of knitting both edges together:

2. Catch one back stitch at a time and place onto the left needle. Then knit two together: You will be knitting the stitch on the back edge that you placed onto the needle and the stitch on the edge with the needle.


3. Knit the stitches on your needle, one at a time, and catch the stitch exactly behind the stitch on the needle. This can be a bit frustrating, as there is no way to secure the stitch in back
Knit approximately five stitches, and then check to see that you haven't begun a slant on the cuff. If you have, go back and start over catching the back stitch and placing it on the left needle.

Inside View

Please check out my site, crookedneedles.net, for more instructions on how to knit a cuff edge and for free patterns and more!
Jo's Bio: I'm a self-taught knitter, crocheter, quilter, etc. Like Virginia Woolf says, as she writes about the importance of weaving things together to make sense, I have to knit every night to still my mind. I usually knit socks for others, sometimes fingerless gloves, hats, chemo hats, and whatever anyone wants. :-)
I am defending my doctoral dissertation from and should graduate this August with a PhD in Rhetoric & Composition and ESL. I just received a full-time job as an ESL Coordinator at Northern Michigan University. I have five children, three grandchildren, and five great nieces/nephews that I count as close as grandchildren. I live on the most beautiful lake in the U.S.: Lake Superior.
Thank you so much for visiting here with us all today Jo, please don't forget to grab your "Featured Button" Below :)
On to the Linky Party:
If you visited last week, you would have noticed that I have started a voting link up, where you can get to vote for your favourite link. The link with the most votes will get featured :)
The link with the most votes last week was:
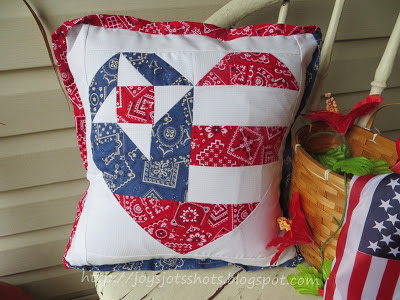
This awesome Old Glory Star Pillow by Joy @ Joy's Jots, Shots & Whatnots
Thank you so much for sharing this wonderful tutorial with us Joy :)
Don't forget to grab your button if you haven't done so already.

Please feel free to link up your crafts below.
They do not have to be tutorials, I would love to see any crafts.
Rules for todays' Craft Linky Party:
- Firstly, your link must be craft related!
- Please do not link up goodies which are on other topics. I have a Sunday Linky Party for Social Media/Blogging Tips and Tricks, if you would like to link up your tips and tricks on this topic you can link them there :)
- Grab my button below and showcase it somewhere on your blog OR create a visible link.
- Do not Link if you are selling or advertising something.
- Be sure to only link the relevant Blogpost and not your whole blog.
- In linking below you are giving me the permission to use of your image if it is being featured the following week. If I am unable to use your image I can unfortunately not feature you.
- Please do not link up stuff you have already linked up before!
- Please note: I will remove content that does not abide by the rules mentioned above.

No comments:
Post a Comment
Thanks for visiting my site and leaving a comment, I really appreciate each and every one.
I will reply to each of your comments, sometimes it does take a while to get around to all of them, but I will reply within 24 hours of you posting. :)